
Hot Process Soap Making
 The process for making soap via the Hot Process method is quite similar to the Cold Process method. In fact many of the same recipes can be use interchangeably between the two methods. In the extended entry below, I have listed the materials needed to start the soap making process. The basic premis behind soap making is to take an acid (fat) and mix it with a base (lye) to form a salt like product that is able to change the surface tension when mixed with water making it ideal for whisking away particles of dirt and oil.
Safety Equipment
Safety First! You will need a pair of safety goggles and a pair of safety gloves. Lye is extremely caustic. You’ll notice just how caustic if you leave it open on a humid day. You might want to also consider an apron specifically for making soap. Unless you’re like me and you think holes in your jeans are cool.
Measuring Equipment
A Scale is a must. All quality soap making formulas depend on the weight of the ingredients and not the volume. I use a $9 postal scale. A measuring cup for the liquid you are going to use. You could measure the water by weight as water has a 1:1 ratio of weight to volume (English and metric). A good set of measuring spoons is always good to have handy for fragrances and/or colors. You will also need a thermometer to check the temperature of the oils and lye solution before mixing them together.
Containers
You’ll need 2 containers that are heat safe and lye safe. I use two heat safe Pyrex glass jars. Glass is great for lye if and only if it is heat safe. When you mix the lye with water it will heat the water up very quickly to 212°+F/100°+C and will cause glass to crack and you will have a strong lye solution all over. Other containers you could consider would include cast iron, steel, ceramic, etc. Never use aluminum! Lye will eat right through it. You’ll also want to have 2 cups (plastic is fine here) to use to hold your oils and lye as you measure them on the scale. Make sure you label these for soap making only. You don’t want to cook with any of these no matter how much you clean them.
Mixing Equipment
Most places suggest a wooden spoon. Really any spoon that is lye safe and heat safe will work. The problem with wooden spoons is after a while they will start to dissolve because of the lye. I would also suggest you invest in a stick blender. This will make the process of mixing your soap 100 times easier.
Ingredients
There are many things you can add to your soap (I’ve even seen formulas that call for ketsup). The basic things you will need are water, lye, and oil.
Oil (lipid): The type of oil you choose will make major differences in the type of soap you get. Each oil has its own properties that it adds to the soap. You can check out the sap table on this site for a list of oils and the properties they have. The table shows the iodine value (the lower the number the harder the bar), type of lather, conditioning, and a general hard/soft bar designation.
Lye: There are two types of “lye” that can be used for soap making; sodium hydroxide (NaOH) or potassium hydroxide (KOH). Sodium hydroxide is often used in making ‘bar’ soaps and potassium hydroxide is often used to make liquid soaps. Both are not readily available anymore. The first place to check is a local hardware store or backing supply store (Lye was/is often used in making soft pretzels a golden brown outside but leaving the inside soft). If you cannot find it locally, your only other option is to call scientific supply stores or search the Internet. You will notice, though, that if you buy more than 2lbs of lye you will be slapped with a $50 shipping charge because of the caustic nature of lye.
Water: A clean bar of soap starts with clean water. I recommend starting with distilled water. You can steep teas in the water to add a variety of properties to your finished soap. You can also replace the water with a variety of different milks. If you are using anything besides distilled water, I would suggest making a small batch of soap to see how it turns out.
Soap Mold
After you have made your soap you need somewhere to put it as it cures. A plastic lined desk drawer works just as well as any fancy mould you can buy. This is another place in soap making where creativity is the limit.
Quick Reference
- Safety Goggles
- Safety Gloves
- Scale
- Measuring Cup
- Thermometer
- 2 dishwasher safe jars/buckets/pots (not aluminum)
- A large mixing spoon (wooden)
- Lye
- A variety of oils
- distilled water
- Soap Mould (mold)
Making the Soap
Now that you have all of your equipment you are ready to make some soap! Setup your work area so that you won’t be disturbed. Open a few windows if you are inside. Line your moulds with wax-paper or plastic and set them aside. I like to set the oils and oil jar I will be using on my left, scale in the middle, lye and lye jar on my right. I also put a few sheets of wax paper under the scale in case of small spills. Measure your oils and keep a record of the weight of each oil. After you have combined all of your oils in your oil container you will need to figure out the amount of lye and liquid you need.
The liquid is easy. Just multiply the total weight of the oil by 28%-40% (.28 – .40). The more liquid you use the longer it will take for the bar to harden. I usually use 30%-33% (.30 – .33). Next you need to figure out the amount of lye. You can do this by hand using the sap table. Take the amount of each oil and multiply it by the SAP # then add the products together to get the total amount of lye. I also have a lye and liquid calculator you can use if you don’t want to do the calculations by hand. The calculator will also give you the amount of lye to use when superfatting your soap (superfatting or leaving some oil in the soap is recommended @ 4-5% to allow for a moisturizing soap that is not harsh on the skin). Put on your safety goggles and gloves (if they are not already on) and measure out the liquid you need. Put it into the empty lye container. Open the lye and measure the amount on the scale that you calculated. Close the lye. Start mixing the liquid and slowly pour the lye into the liquid. Keep stirring until the lye is completely dissolved. The mixture will heat up (and may start to boil). It will also start to release fumes. Lid the container and set it aside to cool.
As the lye solution is cooling you will want to heat up your oils. You want to oil and the lye to be very near the same temperature. The temperature you are shooting for is 100%°-120°F/38°-49°C. A double boiler works great for heating the oils or if the container will fit (and is safe) the microwave at 15-30 second bursts.
Once your lye solution and oils are at or near the same temperature begin stirring the oils then pour the lye solution into the oils while you are stirring. What will happen now is the lye will begin to break the chemical bonds in the oils and create essentially a salt. This is called saponification. While the oils is saponifying you are looking for it to trace (thicken). If you are stirring by hand it can take anywhere from 15-45min to trace depending on the oils you used. You can speed this process up by using a stick blender. If you use a stick blender be cautious of bubbles in your trace. You’ll want to mix until you reach a custard type consistency.
The Hot Process and Cooking the Soap
Once the soap reaches a full trace, it’s time to cook the mixture and force the gel. You will want to put the soap into a crock pot (you could even start the oils out in the pot to heat them up) Put the lid on the crock pot and leave it to cook on low for awhile. The soap will heat up and start to bubble around the edges of the crock pot. Keep an eye on the soap and stir it down gently only if it starts to bubble over. The mix will begin to take on a clear vaseline like look. Once the whole mix has this look, you can test it to see if it is done. Take a small sample of the soap and rub it between your fingers. It should have a waxy feel. Test the soap by touching it to your tongue. Keep cooking….if it ‘zaps’ like a nine volt battery, it’s not done.
Additives
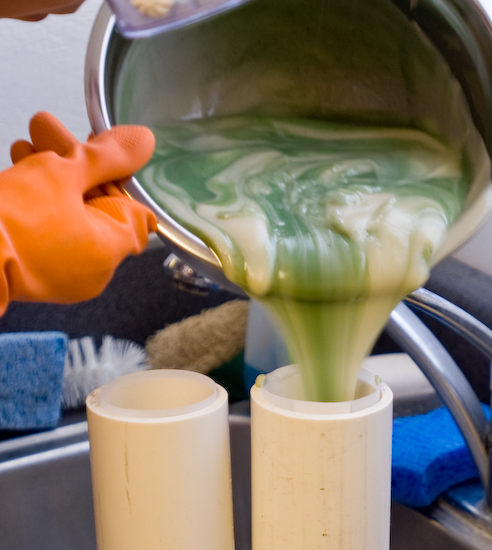
At this point you can add fragrances, extra oils, colors, exfoliants, etc. Once your additives, if any, have been incorporated pour your mixture into the mould(s) you have. Hot process soap is a lot like rebatching when it comes to molding. It doesn’t pour. It is a thick goopy mass (like mashed potatoes) that must be scooped into the mold quickly. Make sure to tap the mold on the counter to get out any air pockets.
Once your soap has reached room temperature remove the mixture from the mould. If you are using a large mould that requires cutting the bars, now is the time to do it. After cutting the bars allow the soap to further cure and harden in a well ventilated area. You may even need to turn them a few times to be sure all sides are exposed to the air. It can take up to six weeks for a bar to be completely finished saponifying. The longer the cure time, the milder the soap will be.
See, that was easy and fun!